 Pin It
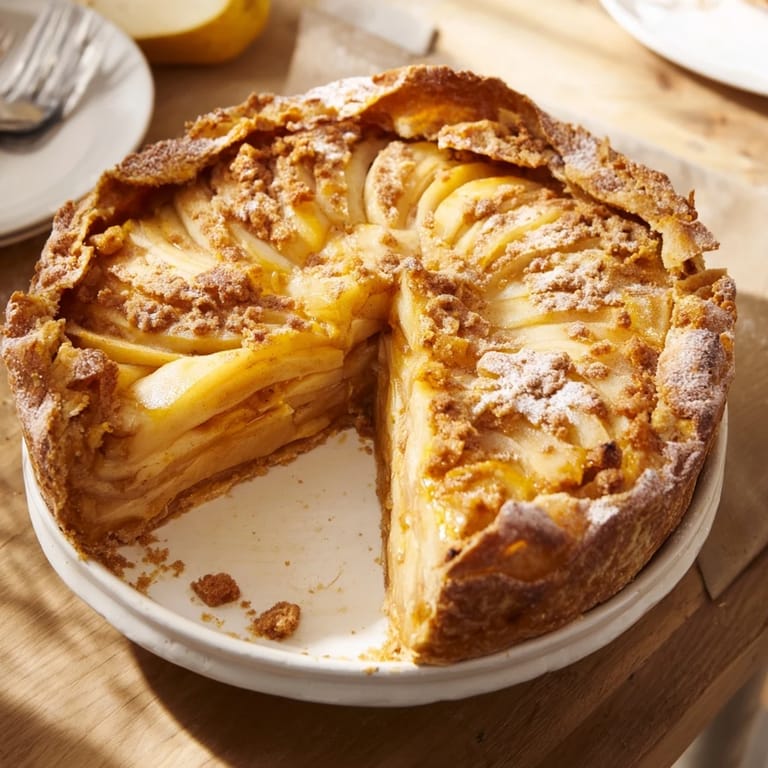
 One Sunday afternoon, I had three pears sitting on the counter that were just past their prime for snacking. I didn't want to waste them, so I pulled out some butter and flour and decided to try my hand at a galette. The kitchen smelled like warm ginger and caramelized sugar within the hour, and I've been making this rustic tart ever since. There's something satisfying about the imperfect, folded edges and the way the fruit bubbles through the crust.
I made this for a small dinner party once, and one of my friends kept saying she couldn't believe I'd made the crust from scratch. It wasn't hard at all, just cold butter and a little patience. Watching everyone reach for seconds made me realize that rustic desserts have a charm that perfect ones sometimes lack. The imperfections are part of the story.
Ingredients
- All-purpose flour: Forms the base of the pastry and gives it structure, make sure to measure it properly by spooning and leveling for the best texture.
- Unsalted butter: Keep it cold and cubed so it creates those flaky layers when it melts in the oven.
- Ice water: Brings the dough together without warming it up, add just enough until it barely holds.
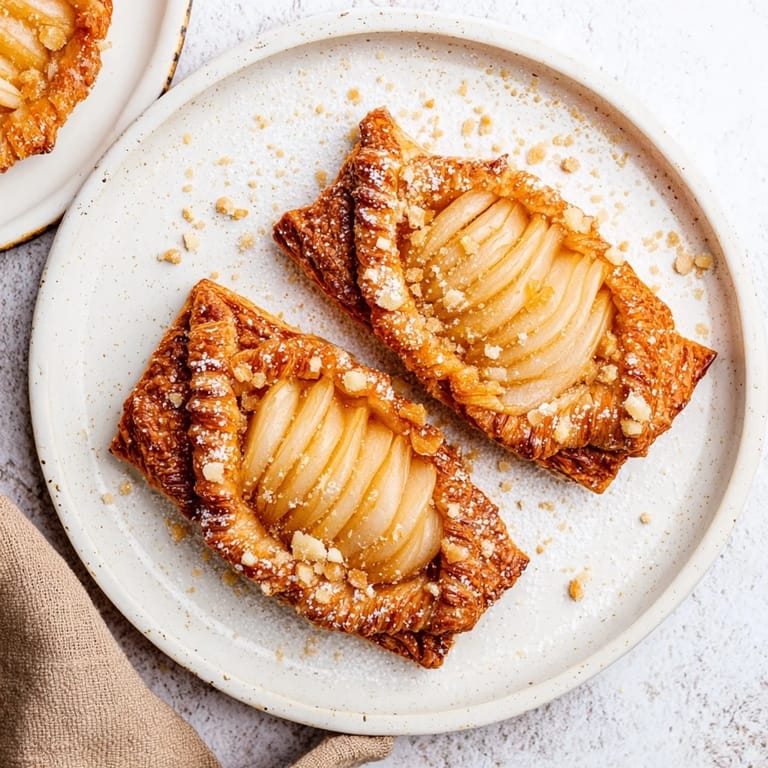
- Ripe pears: Look for pears that yield slightly to pressure, they'll soften beautifully and release sweet juices as they bake.
- Crystallized ginger: Adds little bursts of spicy sweetness throughout the filling, chop it finely so it distributes evenly.
- Light brown sugar: Gives a subtle molasses note that complements the fruit without overpowering it.
- Lemon juice: Brightens the filling and keeps the pears from browning too quickly.
- Ground ginger and cinnamon: Warm spices that make the whole galette smell like fall, even in the middle of summer.
- Cornstarch: Thickens the juices just enough so the crust doesn't get soggy.
- Egg wash: Brushed on the edges for a golden, glossy finish that makes it look bakery-worthy.
- Turbinado sugar: Optional but recommended, it adds a delicate crunch to the crust.
Tired of Takeout? 🥡
Get 10 meals you can make faster than delivery arrives. Seriously.
One email. No spam. Unsubscribe anytime.
Instructions
- Make the Pastry:
- In a large bowl, whisk together flour, sugar, and salt, then add cold butter cubes and use your fingertips or a pastry blender to work it in until the mixture looks like coarse sand with a few pea-sized pieces. Drizzle in ice water one tablespoon at a time, mixing gently until the dough just starts to clump together, then press it into a disk, wrap it tightly, and chill for at least 30 minutes.
- Prepare the Filling:
- Toss your sliced pears with lemon juice, brown sugar, chopped crystallized ginger, ground ginger, cinnamon, and cornstarch in a medium bowl until everything is evenly coated. Set it aside while the dough chills so the flavors can mingle.
- Roll Out the Dough:
- On a lightly floured surface, roll the chilled dough into a rough 12-inch circle, don't worry about perfect edges. Carefully transfer it to a parchment-lined baking sheet.
- Assemble the Galette:
- Spoon the pear mixture into the center of the dough, leaving about a 2-inch border all around, then fold the edges up and over the filling in loose pleats. It should look rustic and relaxed, not tight or fussy.
- Finish and Bake:
- Brush the folded pastry edges with beaten egg and sprinkle turbinado sugar over the top if you like a little sparkle and crunch. Bake at 400°F for 35 to 40 minutes until the crust is deeply golden and the filling is bubbling in the center.
- Cool and Serve:
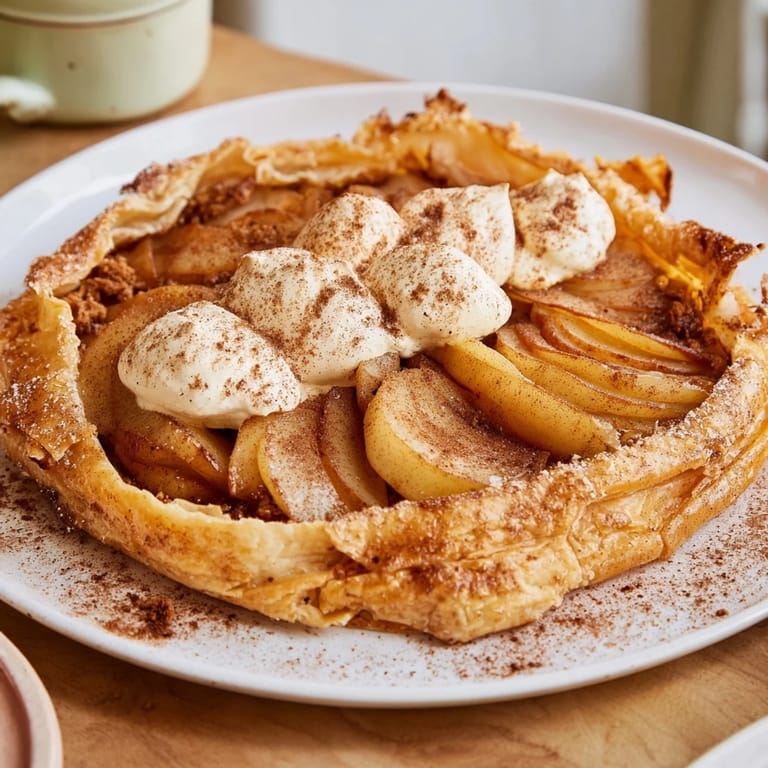
- Let the galette cool on the pan for at least 10 minutes before slicing. Serve it warm or at room temperature with a scoop of vanilla ice cream or a dollop of whipped cream.
 Pin It
 The first time I served this, my brother said it tasted like the kind of dessert you'd find in a tiny French bakery. I laughed because I'd made it in my regular kitchen with pears from the grocery store. But that's the magic of a galette, it takes simple ingredients and turns them into something that feels special and handmade.
Choosing the Right Pears
I've tried this with Bartlett, Bosc, and Anjou pears, and they all work beautifully as long as they're ripe but still firm. If your pears are rock hard, let them sit on the counter for a day or two until they give just a little when you press near the stem. Overripe pears will break down too much and make the filling mushy, so aim for that sweet spot where they're fragrant and slightly soft.
Storage and Reheating
This galette is at its absolute best the day it's baked, when the crust is crisp and the filling is still warm. If you have leftovers, store them loosely covered in the fridge for up to two days. To bring back some of that fresh-baked texture, reheat individual slices in a 350°F oven for about 10 minutes.
Variations and Swaps
You can easily swap the pears for thinly sliced apples or even a mix of stone fruit like peaches and plums when they're in season. If you're not a fan of ginger, try cardamom or a little orange zest instead. The crust also works beautifully with savory fillings like caramelized onions and goat cheese if you're feeling adventurous.
- Add a handful of fresh or frozen berries to the pear mixture for extra color and tartness.
- Brush the baked galette with warm apricot jam for a glossy, bakery-style finish.
- Serve with a drizzle of salted caramel or a sprinkle of toasted almonds for added richness.
 Pin It
 This galette has become my go-to dessert when I want something homemade but don't have hours to spend in the kitchen. It's forgiving, delicious, and always feels like a little celebration.
Recipe FAQs
- → How do I prevent the pastry from becoming soggy?
Chilling the dough before rolling helps maintain flakiness. Also, tossing pears with lemon juice and cornstarch absorbs excess moisture to keep the crust crisp.
- → Can I use other fruits in place of pears?
Yes, apples or a mix of berries can substitute or complement the pears for varied flavors and textures.
- → What does crystallized ginger add to the filling?
Crystallized ginger contributes subtle spicy-sweet bursts and chewy texture, intensifying the ginger aroma without overpowering the fruit.
- → How should I serve the galette for best taste?
Serve warm or at room temperature, optionally alongside whipped cream or vanilla ice cream to enhance richness.
- → Is there a tip to achieve a golden crust?
Brushing the edges with beaten egg prior to baking helps develop a glossy, golden finish that complements the rustic look.