 Pin It
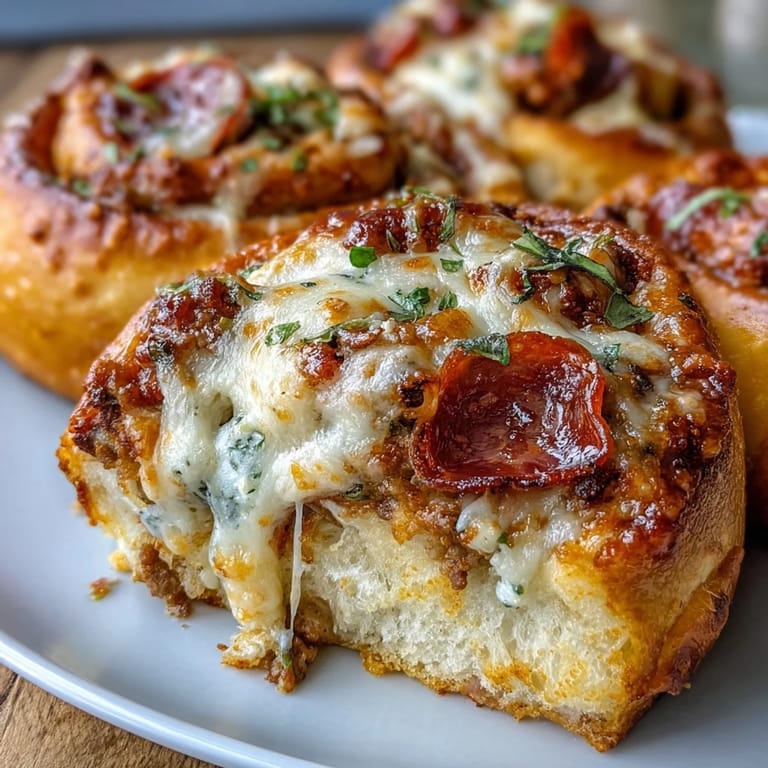
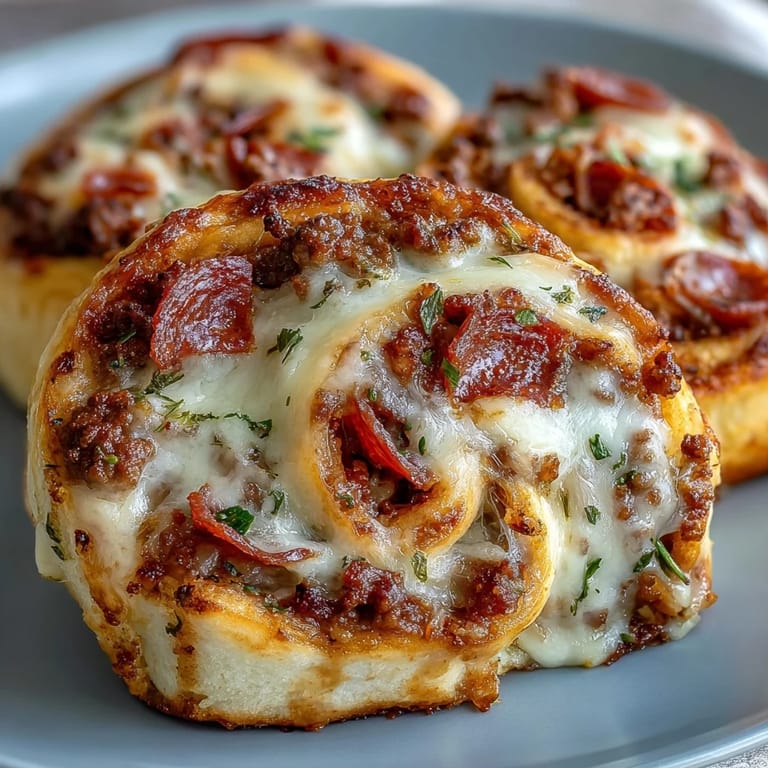
 The first batch came out lopsided and oozing cheese all over the pan, but my daughter still grabbed two straight from the oven. I was trying to sneak more protein into our afternoons without anyone noticing, and these rolls became the unexpected hero. Now they vanish before they even cool, and nobody asks if they're healthy. They just ask when I'm making more.
I started making these on Sundays for the week ahead, and my husband would sneak one cold from the fridge on his way out the door. One morning I caught him wrapping three in foil for his lunch, and he admitted he'd been trading his coworkers for them. That's when I knew I had to double every batch.
Ingredients
- Plain Greek yogurt (nonfat or low fat): This is the magic behind the soft, high protein dough, and it keeps the rolls moist without any butter or oil in the base.
- Self rising flour: It gives the dough just enough lift and chew, and if you don't have it, the homemade substitute works perfectly every time.
- Egg: Binds everything together and adds richness, plus it brushes beautifully on top for that golden finish.
- Garlic powder and salt: These quiet heroes make the dough taste like pizza crust, not just bread.
- Lean ground beef: I use 5 percent fat or less to keep it light, and browning it with the herbs makes the filling taste like real pizza topping.
- Turkey or beef pepperoni slices: They curl up and crisp at the edges in the oven, giving you those little pockets of salty, spicy goodness.
- Shredded part skim mozzarella cheese: It melts into gooey strings without making the rolls too greasy, and it holds everything together.
- Pizza sauce: Use your favorite jarred kind or leftover homemade, just don't overdo it or the rolls will get soggy.
- Dried Italian herbs: A blend of oregano and basil brings that classic pizza shop smell right into your kitchen.
- Black pepper and crushed red pepper flakes: The black pepper goes in the beef, and the red flakes are optional but highly recommended if you like a little kick.
- Olive oil: Just a light brush on top before baking makes them golden and keeps the Parmesan from burning.
- Grated Parmesan cheese: It forms a salty, crispy crust on top that everyone fights over.
- Dried parsley or Italian herbs: A final sprinkle makes them look bakery pretty and adds a fresh note.
Tired of Takeout? 🥡
Get 10 meals you can make faster than delivery arrives. Seriously.
One email. No spam. Unsubscribe anytime.
Instructions
- Preheat and Prep:
- Set your oven to 400 degrees Fahrenheit and line a baking sheet with parchment paper so nothing sticks. This also makes cleanup almost nonexistent.
- Brown the Beef:
- Cook the ground beef in a nonstick skillet over medium heat, breaking it up with a wooden spoon until it's browned and crumbly, about four to five minutes. Stir in the black pepper and Italian herbs, then let it cool a bit so it doesn't melt the cheese too early.
- Make the Dough:
- In a large bowl, combine Greek yogurt, self rising flour, egg, garlic powder, and salt, stirring until a sticky dough forms. Turn it out onto a floured surface and knead for two to three minutes until it's smooth and easy to handle.
- Roll It Out:
- Roll the dough into a rectangle about twelve by ten inches, dusting with a little flour if it sticks. Don't stress if it's not perfect, rustic is part of the charm.
- Spread the Sauce:
- Spread pizza sauce evenly over the dough, leaving a half inch border all around so the filling doesn't ooze out when you roll it. A thin layer is better than too much.
- Add the Filling:
- Scatter the cooked beef, pepperoni slices, and mozzarella cheese evenly over the sauce. Try to keep it even so every roll gets a fair share of everything.
- Roll It Up:
- Starting from one long edge, roll the dough tightly into a log, keeping the filling tucked in as you go. Pinch the seam gently to seal it.
- Slice Into Rolls:
- Use a sharp knife to cut the log into twelve equal pieces, wiping the blade between cuts if it gets sticky. Arrange them cut side up on your baking sheet with a little space between each.
- Brush and Top:
- Brush the tops lightly with olive oil, then sprinkle with Parmesan and dried parsley or herbs. This is what makes them look and taste like they came from a pizzeria.
- Bake Until Golden:
- Bake for eighteen to twenty two minutes, or until the tops are golden brown and the cheese is bubbling. Let them cool for a few minutes before you dig in, or you'll burn your tongue like I always do.
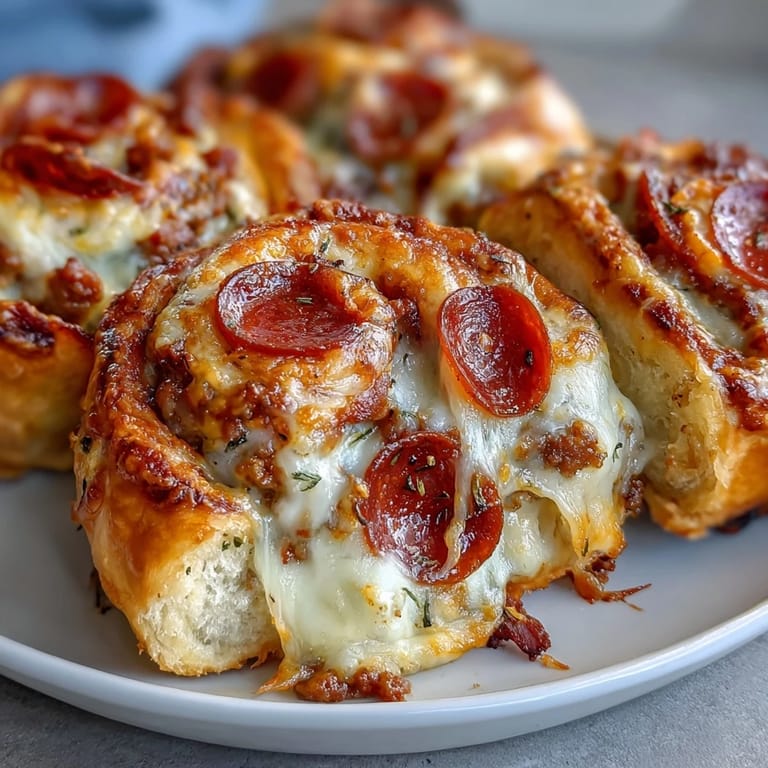
 Pin It
 One evening I packed a container of these for a potluck, and a friend who usually avoids carbs ate three and asked for the recipe. She texted me later that night saying her kids devoured the batch she made for breakfast. That's when I realized these weren't just meal prep, they were a quiet kitchen win that made people happy.
How to Store and Reheat
I keep leftovers in an airtight container in the fridge for up to four days, and they reheat beautifully in a 350 degree oven for about eight minutes. You can also microwave one for thirty seconds if you're in a rush, but the oven keeps them crispier. For freezing, I let them cool completely, wrap each one in foil, and stack them in a freezer bag for up to three months, then reheat from frozen at 350 degrees for ten to twelve minutes.
Swaps and Add Ins
If you want to skip the beef, ground turkey or chicken work just as well, and I've even used crumbled cooked sausage when I had it on hand. For a veggie boost, finely chopped bell peppers, spinach, or mushrooms fold right into the filling without making things watery. Sometimes I'll swap the mozzarella for a sharp cheddar or add a handful of sliced olives if I'm feeling fancy.
Serving Suggestions
These are perfect on their own, but I love serving them with a little bowl of warm marinara or ranch for dipping. A simple side salad with Italian dressing turns them into a full meal, and they're great alongside roasted vegetables or a cup of soup. They also work as a party appetizer, and I've seen people demolish a whole tray in minutes.
- Serve with extra pizza sauce or garlic butter for dipping.
- Pair with a crisp green salad or crunchy carrot sticks.
- Pack them in lunchboxes with a piece of fruit and some veggies for a balanced meal.
 Pin It
 These rolls have become my go to whenever I need something fast, filling, and actually delicious, and I hope they do the same for you. Enjoy every cheesy, savory bite.
Recipe FAQs
- → Can I use regular flour instead of self-rising?
Yes, simply mix 2 cups all-purpose flour with 3 tsp baking powder and 1/2 tsp salt to create your own self-rising flour substitute.
- → How long do these stay fresh?
Store in an airtight container in the refrigerator for up to 4 days. They also freeze exceptionally well for up to 3 months.
- → Can I make these vegetarian?
Absolutely—replace the ground beef with plant-based crumbles and use vegetarian pepperoni. The protein content will vary slightly.
- → What makes the dough protein-rich?
The combination of Greek yogurt (high protein), eggs, and the reduced-fat cheese blend creates a dough with significantly more protein than traditional pizza dough.
- → Can I add vegetables to the filling?
Finely chopped bell peppers, spinach, or mushrooms work wonderfully. Just cook them first to remove excess moisture so the rolls don't become soggy.
- → What's the best way to reheat frozen rolls?
Bake frozen rolls at 350°F (175°C) for 10–12 minutes until heated through and cheese is melted. Microwaving works but creates a softer texture.