 Pin It
 The first time I heard the satisfying crunch of a grilled onigiri, it was from the corner of a bustling Tokyo food market, mixed with laughter, sizzling sounds, and the fragrant waft of sesame oil. That memory stayed with me, sparking curiosity and a bit of stubbornness to recreate it at home. It wasn’t the glossy cookbooks that taught me, but a series of happy kitchen accidents—rice too hot to handle, salmon flaking perfectly under a fork, nori strips that didn't always wrap as planned. Grilled salmon onigiri became an occasional ritual: simple ingredients, but your hands become the real tools of shaping and sharing. It's impossible to make these without inevitably sneaking a taste as you work.
Last summer, I packed a batch of these for a train ride with friends. We unwrapped our onigiri somewhere between city and mountains, the nori crackled and a little bit of grilled salmon tumbled out—everyone agreed they tasted like an adventure in each bite.
Ingredients
- Skinless salmon fillet: Go for fresh if possible—it gives a succulent, restaurant-worthy filling, but canned salmon will do in a pinch.
- Soy sauce: This infuses the fish with a deep savory note — the trick is to brush it on just before grilling so it caramelizes slightly.
- Mirin: Don’t skip this; its subtle sweetness balances the soy’s saltiness and brings out the salmon’s best side.
- Toasted sesame oil: Adds a nutty aroma and echoes the flavor of sesame seeds on the finished rice balls.
- Salt and black pepper: A modest touch is all you need to make the salmon sing, but don’t be shy about seasoning.
- Japanese short-grain rice: Only this type offers that sticky, ever-so-slightly chewy texture that’s essential for shaping onigiri—long-grain just won’t stick together.
- Water: The right ratio makes or breaks the rice; don’t eyeball it the first few times.
- Rice vinegar (optional): Adding vinegar gives the rice a clean lift, almost like a subtle nod to sushi flavors—a nice twist if you’re in the mood.
- Nori (seaweed sheets): These are both wrapper and flavor burst—slice them into manageable strips so each bite is tidy and satisfying.
- White sesame seeds (optional): Toasted seeds add a hint of crunch and warmth—I usually sprinkle them on at the very end.
- Water & salt for shaping: Wet, salted hands are non-negotiable to prevent sticking and to season the onigiri’s surface just right.
Tired of Takeout? 🥡
Get 10 meals you can make faster than delivery arrives. Seriously.
One email. No spam. Unsubscribe anytime.
Instructions
- Cook the Rice:
- Rinse the rice under cold water until it runs clear, then let it drain in a fine sieve. Cook the rice in a rice cooker or saucepan with the measured water, let it rest covered, and season with salt and a splash of rice vinegar if you like that extra brightness.
- Season & Grill the Salmon:
- Mix soy sauce, mirin, and sesame oil, then brush all over the salmon fillet; sprinkle on salt and black pepper. Grill or oven-bake until the salmon is cooked through and delicately flaking apart—your kitchen will start to smell irresistible at this stage.
- Flake the Salmon:
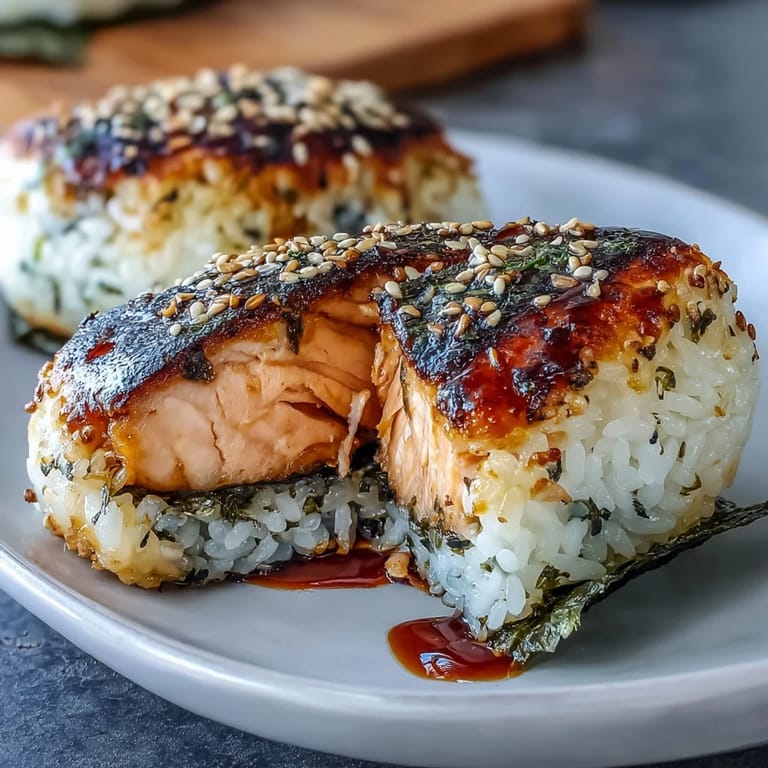
- Once slightly cool, use a fork to break the salmon into bite-sized, moist flakes—taste a little if you can't resist. Set aside on a plate, ready for sneaking into the rice.
- Shape the Onigiri:
- Fill a bowl with water and another with salt; dip your hands so nothing sticks. Scoop a mound of warm rice, flatten gently, add a spoonful of salmon, then shape around it tightly into a sturdy triangle—press just enough so it stays together without mashing.
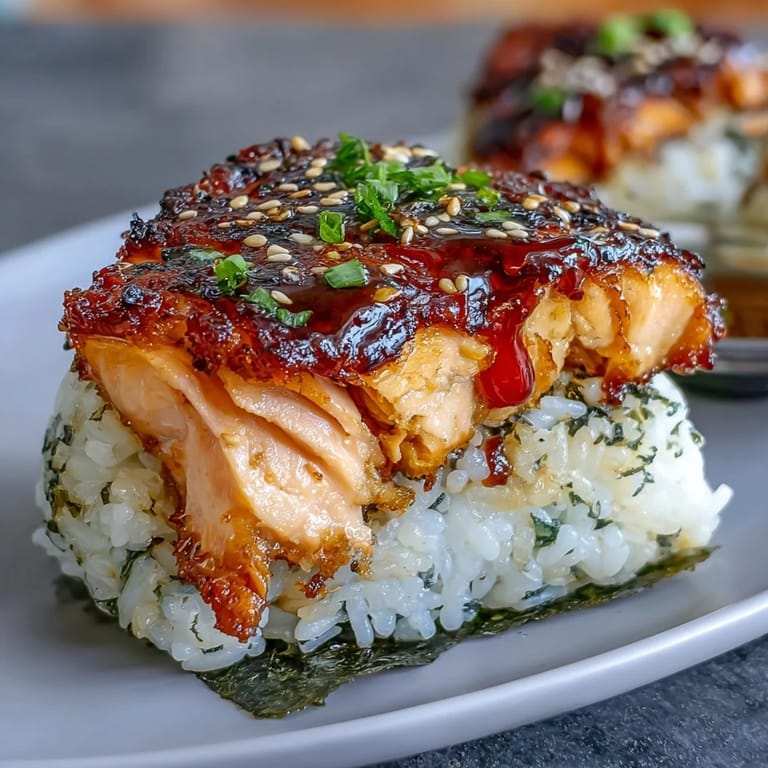
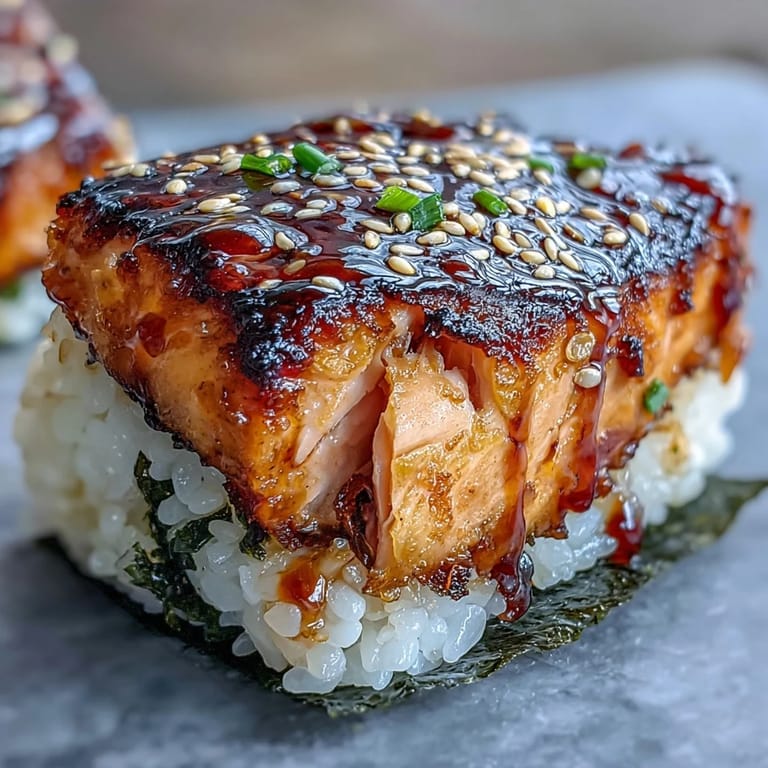
- Grill the Onigiri Balls:
- Heat a lightly oiled skillet or grill pan over medium, then set the molded rice balls in, allowing each side to crisp and color for a couple of minutes. Optionally brush on a little soy sauce for that golden glaze and an extra hit of flavor.
- Wrap and Finish:
- Remove from the pan and, while still warm, nestle each onigiri into a nori strip; sprinkle with sesame seeds for a gentle crunch. Serve immediately, or wrap and tuck into a lunchbox—enjoy as a savory snack or part of a simple meal.
 Pin It
 One rainy afternoon, I made these for my partner as we listened to soft jazz and watched the world outside go gray. The salmon onigiri made a gloomy day instantly cozier, and even the cat tried to sneak a piece off the plate.
Getting That Perfectly Crisped Crust
If the pan’s not hot enough, you’ll miss out on the signature savory crust that makes grilled onigiri so special. Don’t be shy about peeking underneath—just wait until it’s truly golden before flipping to the next side, and give each batch enough room in the pan so they don't steam instead of sear.
Keeping the Rice Soft Inside
Vigorously fluffing the rice after cooking keeps it from getting gummy. When shaping, if you press too hard, the inside will get dense; gentle but deliberate hands make for the most pleasing texture.
Customizing Your Fillings (and Saving Leftovers)
Tiny bits of pickled plum, a trace of wasabi, or even leftover cooked veggies can all find a home inside these rice balls—don’t be afraid to get creative once you master the basics. Leftover onigiri actually taste great pan-crisped again the next day, just refresh them in a hot skillet.
- Wrap leftovers in plastic to keep the rice from drying.
- Don’t overfill, or shaping gets messy quickly.
- Brush the finished onigiri with a touch more soy sauce if you want extra savory bite.
 Pin It
 If you end up with sticky fingers and a few odd-shaped onigiri, just remember—those always taste the best. Happy shaping and happy snacking!
Recipe FAQs
- → What rice is best for onigiri?
Use Japanese short-grain rice for its stickiness and tender texture. Rinse until the water runs clear, cook with the proper water ratio, and let it rest covered for 10 minutes before shaping.
- → Can I use canned salmon instead of fresh?
Yes. Drain and flake canned salmon, then season lightly with soy and mirin or a touch of sesame oil to boost flavor. Fresh grilled salmon, however, gives a fuller texture and charred notes.
- → How do I keep rice from sticking to my hands?
Keep a small bowl of water and another with salt nearby. Wet your palms before handling rice and rub a pinch of salt on them—this helps shape the onigiri and seasons the exterior.
- → How do I get a crisp, golden exterior?
Lightly oil a nonstick skillet or grill pan over medium heat and sear the formed rice balls 2–3 minutes per side until golden. Brushing a thin layer of soy before flipping adds color and savory depth.
- → How should I store and reheat leftovers?
Store cooled onigiri in an airtight container in the fridge for up to 2 days. Reheat gently in a low oven or a skillet to restore crispness; avoid microwaving too long or the rice will become gummy.
- → What other fillings pair well with grilled salmon?
Try umeboshi (pickled plum), cooked tuna with mayo and scallions, pickled vegetables, or a dab of wasabi for heat. Sesame seeds and furikake also enhance texture and flavor.