 Pin It
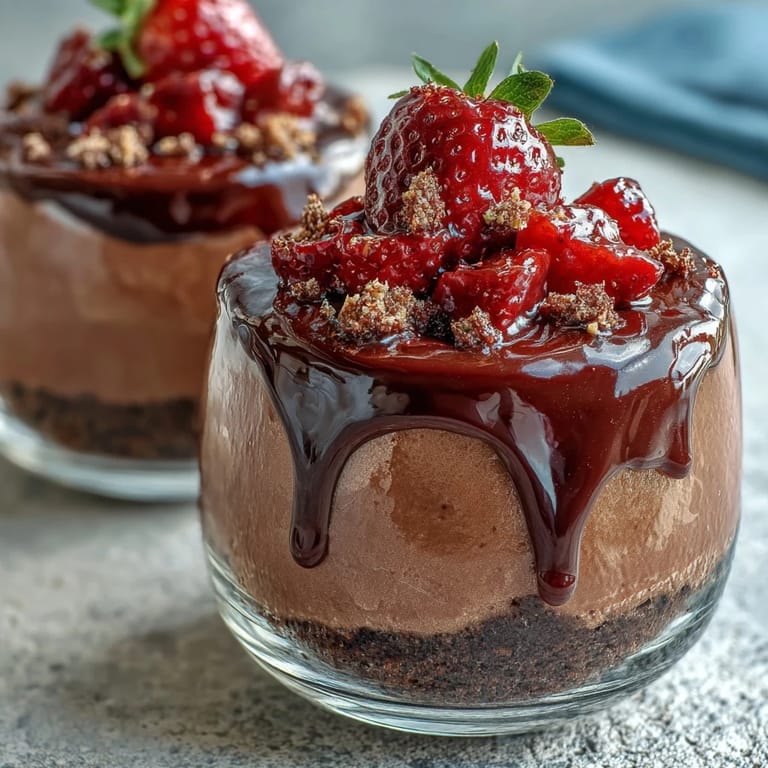
 Last summer, a friend returned from Dubai with stories about the desserts she'd eaten, particularly these stunning chocolate and strawberry cups that appeared in every fancy patisserie window. She described them so vividly—the way the ganache caught the light, how the strawberries looked like rubies nestled in cream—that I became obsessed with recreating them at home. What struck me most was her insistence that they weren't complicated, just elegant. One rainy afternoon, I finally attempted my own version, and something magical happened in those glass cups.
I made these for a dinner party where I was genuinely nervous about the menu, but the moment I set these cups down and saw everyone's faces light up, I realized something had shifted. A usually quiet guest asked for the recipe before even tasting it. That's when I understood these weren't just pretty—they tasted like sophistication, like someone had spent all day on them, even though we both knew better.
Ingredients
- Chocolate digestive biscuits (150 g, crushed): These form your crumbly, slightly bitter foundation that prevents the filling from sliding around; if you can't find them, any dark chocolate cookie works, though digestives have that perfect balance of sweetness and cocoa depth.
- Unsalted butter (50 g, melted): Just enough to bind the crumbs together without making them greasy or stealing the show from what comes next.
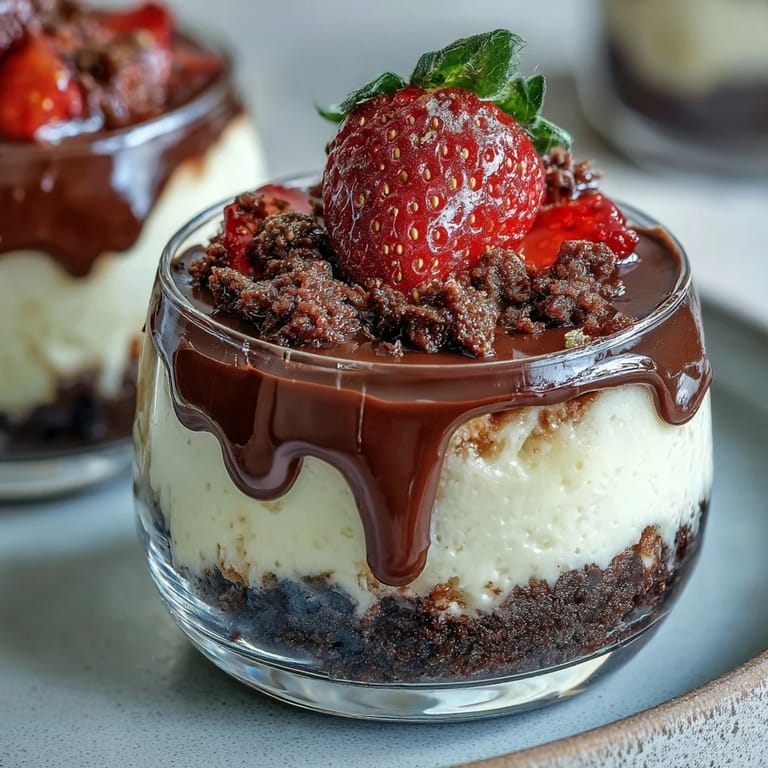
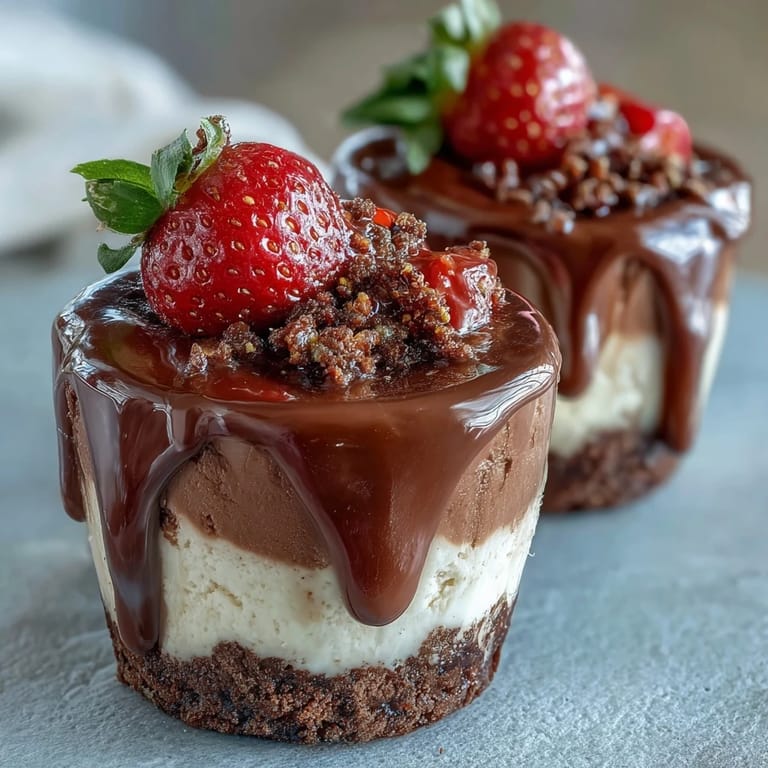
- Cream cheese (250 g, softened): The star of the filling—it needs to be truly soft or you'll spend forever trying to beat out the lumps, which is annoying and unnecessary.
- Powdered sugar (80 g): Finer than granulated, it dissolves into the cream cheese smoothly and won't create a grainy texture that ruins the whole experience.
- Heavy cream (200 ml for filling, 80 ml for ganache, both cold): Temperature matters here; cold cream whips faster and holds its peaks better, transforming the dense cream cheese into something cloud-like.
- Vanilla extract (1 tsp): A whisper of vanilla that somehow makes every other flavor taste more like itself.
- Fresh strawberries (200 g sliced, plus 6 whole for garnish): The brightness here cuts through all that richness and prevents the dessert from feeling heavy, which is why they're essential, not optional.
- Sugar (1 tbsp optional): Macerating the strawberries draws out their juice and softens them slightly, creating a natural glaze that seeps down through the layers.
- Dark chocolate (80 g, chopped): Quality matters more here than anywhere else because this ganache sits on top and gets tasted first; buy something you'd actually eat on its own.
- Chocolate shavings and crushed pistachios (for garnish): These add texture and that Dubai-inspired sophistication that makes people think you know something they don't.
Tired of Takeout? 🥡
Get 10 meals you can make faster than delivery arrives. Seriously.
One email. No spam. Unsubscribe anytime.
Instructions
- Crush and press the base:
- Mix your chocolate biscuit crumbs with melted butter until they look like wet sand, then press a small handful firmly into the bottom of each cup. You want it dense enough to support everything above it, but don't compress it so hard that it becomes an impenetrable brick.
- Whip the filling:
- Beat softened cream cheese and powdered sugar until completely smooth—this takes longer than you think, maybe 3-4 minutes of real effort. In a separate bowl, whip the cold heavy cream with vanilla to soft peaks (it should look fluffy but still fall slightly when you lift the whisk), then fold it gently into the cream cheese using as few strokes as possible to keep all that air trapped inside.
- Fill the cups:
- Spoon or pipe the filling over each biscuit base, smoothing the tops with a spatula so you have a relatively even surface for the strawberry layer.
- Layer the strawberries:
- Toss your sliced strawberries with a tablespoon of sugar and let them sit for 10 minutes, which sounds small but makes a real difference—their own juice becomes a light syrup. Distribute them evenly over each cup's filling.
- Make the ganache:
- Heat heavy cream just until it starts to steam and barely simmer, pour it over chopped chocolate, wait one full minute without stirring, then stir until glossy and smooth. Let it cool for a few minutes so it's warm but not hot before spooning a thin layer over the strawberries—this coating seals in the fruit and adds that final luxurious element.
- Chill and set:
- Refrigerate for at least two hours, which gives the base time to firm up, the filling to stabilize, and all the flavors to become friends with each other.
- Garnish and serve:
- Top each cup with a whole strawberry, a scatter of chocolate shavings, and crushed pistachios if you're feeling fancy, which honestly makes them look restaurant-quality and taste even better.
 Pin It
 The real turning point came when I realized these cups didn't need my stress or perfectionism—they needed my presence and a little patience. Making them became something I actually looked forward to, a small ritual of layering flavors and textures that somehow felt meaningful in a way everyday cooking doesn't always.
Why the No-Bake Approach Changes Everything
There's something liberating about a dessert that doesn't require you to monitor an oven or worry about baking times varying with humidity and kitchen quirks. The texture you get from this no-bake method is actually superior to anything you could achieve with heat—the filling stays silky and light because the cold heavy cream keeps it that way. Plus, there's a directness to the process that feels honest somehow, like you're not hiding behind technique.
The Magic of Macerated Strawberries
That ten-minute wait where the strawberries sit with sugar seems insignificant until you actually taste it. The berries release their own juice, creating a subtle glaze that isn't syrupy or artificial but tastes like pure strawberry essence. When you spoon them over the cheesecake, that liquid seeps down and mingles with the cream, adding moisture and depth. It's one of those small cooking moments that separates something good from something memorable.
Customizing Without Losing the Heart
The notes from the original recipe suggest adding cardamom or a pistachio layer, and both of those feel natural here because the base flavors are strong enough to support them. I tried the cardamom version once and suddenly the dessert felt warm and spiced, more sophisticated and less tourist-friendly, which might be exactly what you want. The beauty of these cups is that they're structured enough to accommodate changes while staying true to themselves.
- Add a pinch of cardamom to the cheesecake mixture if you want the Dubai-inspired warmth that makes it taste more grown-up and complex.
- Layer crushed pistachios between the base and filling for an extra textural element that prevents the whole thing from feeling one-note in texture.
- Make these up to 24 hours ahead without any worry—if anything, the flavors meld even better overnight, so this is genuinely make-ahead friendly.
 Pin It
 These cups remind me that the most elegant desserts often come from understanding basic techniques rather than complicated recipes. Serve them cold, watch people's faces, and know that you've created something genuinely worth tasting.
Recipe FAQs
- → How do I prevent the biscuit base from becoming soggy?
Press the crushed biscuits firmly into the cups and chill them before adding the creamy layers. This helps maintain a crisp texture.
- → Can I substitute cream cheese with another ingredient?
For a lighter option, mascarpone or ricotta can be used, but expect slight changes in texture and richness.
- → Is it necessary to macerate the strawberries?
Macerating with a bit of sugar softens the strawberries and enhances their natural sweetness, improving flavor and texture.
- → How long should the cups chill before serving?
Refrigerate for at least 2 hours to allow the layers to set and flavors to meld beautifully.
- → Can these cups be prepared in advance?
Yes, they can be made up to 24 hours ahead, stored covered in the fridge to maintain freshness.
- → What is the purpose of the chocolate ganache layer?
The ganache adds a glossy, rich topping that balances the fruity and creamy layers with a smooth chocolate finish.